Crontab setup
You have to setup the crontab for the magento user, the user which has got root privileges on your server.
It is not named “root” and it belong to the “www-data” group.
In my case, I’m this user.
You can read the article Install Magento 2 if you forget how permissions and users works with Magento 2
Before, we have to find the path of 2 files :
– php.ini
– php binary file
For the first, create a phpinfo.php file on your Magento root folder, and put :
<?php
phpinfo();
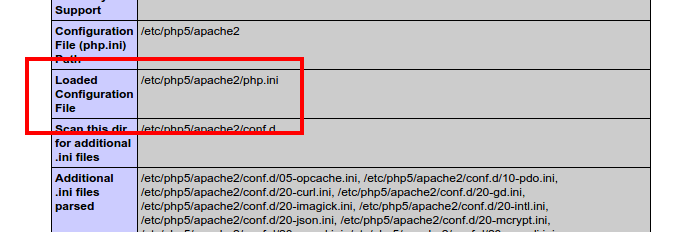
You will find the php.ini file path :

For me it’s :
etc/php5/apache2/php.ini
Delete file phpinfo.php
To find the php binary:
which php
For me it’s :
/usr/bin/php
Now we can create the crontab !
Launch the command :
sudo crontab -u <magento_user> -e
My magento_user is me : maxime
The crontab content is (put the right php binary, and php.ini pathes) :
*/1 * * * * /usr/bin/php -c etc/php5/apache2/php.ini /var/www/magento2/bin/magento cron:run >> /var/www/magento2/var/log/magento.cron.log&
*/1 * * * * /usr/bin/php -c etc/php5/apache2/php.ini /var/www/magento2/update/cron.php >> /var/www/magento2/var/log/update.cron.log&
*/1 * * * * /usr/bin/php -c etc/php5/apache2/php.ini /var/www/magento2/bin/magento setup:cron:run >> /var/www/magento2/var/log/setup.cron.log&
– */1 * * * * : Cron launched every minutes
– /usr/bin/php : php binary path
– etc/php5/apache2/php.ini : php.ini path
– /var/www/magento2/ : Magento 2 root folder
– >> : redirect the output to a logfile for debug
The first command launch Magento cron.
The other two commands are used by the Component Manager and System Upgrade. (Not interesting in this lesson)
Create a cron job on Magento 2 module
Now, our crontab is ready, so we will add our cron !
Create the file :
app/code/Maxime/Jobs/etc/crontab.xml
With this content :
<?xml version="1.0"?>
<config xmlns:xsi="http://www.w3.org/2001/XMLSchema-instance" xsi:noNamespaceSchemaLocation="urn:magento:module:Magento_Cron:etc/crontab.xsd">
    <group id="default">
        <job name="maxime_jobs_disable_jobs" instance="Maxime\Jobs\Cron\DisableJobs" method="execute">
            <!-- Every five minutes -->
            <schedule>*/5 * * * *</schedule>
            <!--<config_path>jobs/cron/schedule</config_path>-->
        </job>
    </group>
</config>
– group_id : a group of cron job, I will explain it later on this article
– name : cron name, it must be unique
– instance : the class which will be called
– method : the method which will be called
– schedule : the schedule of our cron with Cron Format
– config_path : You can put this instead of schedule tag in order to set the schedule on Magento 2 config, we will do that later on this article
We declared a class on the XML, we will create it !
Add the following file :
app/code/Maxime/Jobs/Cron/DisableJobs.php
And put this content :
<?php
/**
 * Copyright © 2015 Magento. All rights reserved.
 * See COPYING.txt for license details.
 */
namespace Maxime\Jobs\Cron;

class DisableJobs
{
    /**
     * @var \Maxime\Jobs\Model\Job
     */
    protected $_job;

    /**
     * @param \Maxime\Jobs\Model\Job $job
     */
    public function __construct(
        \Maxime\Jobs\Model\Job $job
    ) {
        $this->_job = $job;
    }

    /**
     * Disable jobs which date is less than the current date
     *
     * @param \Magento\Cron\Model\Schedule $schedule
     * @return void
     */
    public function execute(\Magento\Cron\Model\Schedule $schedule)
    {
        $nowDate = date('Y-m-d');
        $jobsCollection = $this->_job->getCollection()
            ->addFieldToFilter('date', array ('lt' => $nowDate));

        foreach($jobsCollection AS $job) {
            $job->setStatus($job->getDisableStatus());
            $job->save();
        }
    }
}
We will not test the content of this method. We will create an unit test later in the training to check if the code is ok.
Don’t check if the cron creation is ok, continue to read the lesson, we will do more tests later on this page
Check scheduled cron
Magento 2 launch it’s cron every minutes.
During this call, it will check every crontab.xml files in order to schedule the next cron job to launch.
Where can you find its ?
We will find the list inside the table cron_schedule

You will see :
– The job code set on the XML
– Status of the job
– Messages of the job. It can contain an exception message if the job failed
– Creation date of the job
– Scheduled date of the job
– Beginning date of the job
– End date of the job if is OK
Cron group with Magento 2
As you can see, we defined a group_id on the XML file.
Magento has got 2 groups :
– default (Magento run it every 15 minutes by default, so if you schedule a task every minutes, it will be really run every 15 minutes)
– index (Magento run it every minutes)
You can put your job inside one of these groups.
But what is the goal of these groups ?
With it, you can run parallel tasks.
If you have a long cron job, it will run without lock the other jobs.
So the 2 natives groups allow Magento to run tasks and reindex at the same time.

Run cron using the command line
Here is the command to type inside the Magento root folder :
./bin/magento magento cron:run [--group=""]
To schedule / launch all groups :
./bin/magento magento cron:run
To schedule / launch default group:
./bin/magento magento cron:run --group="default"
To schedule / launch a custom group:
./bin/magento magento cron:run --group="maxime_jobs"
You may have to launch the command twice. The first time will shedule tasks on table, the second will run it
Configure cron on Magento 2 admin
You have some configurable fields ont the admin.
You have to go on : Stores > Configuration > Advanced > System
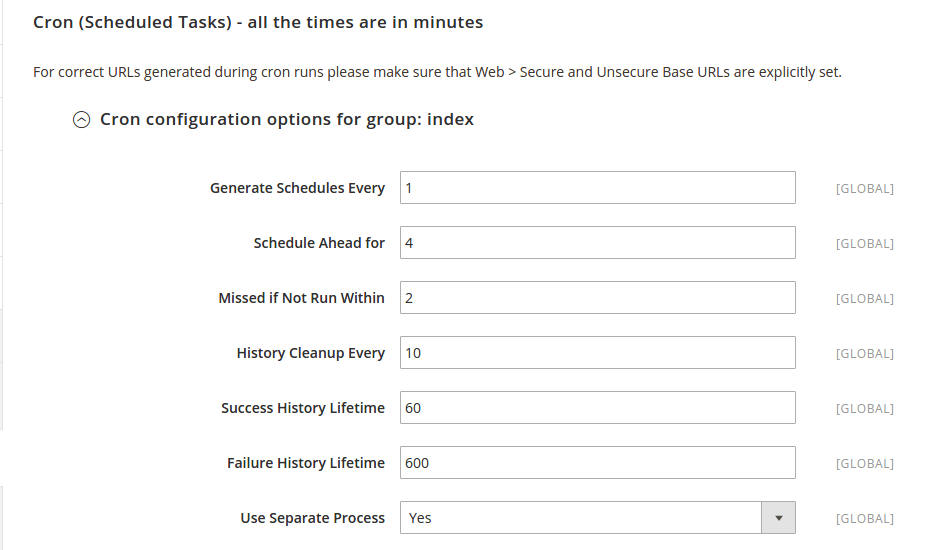
You will see a cron section :

The first is for the default group, the second for index group.
| Option | Description |
|---|---|
| schedule_generate_every | Will schedule the group’s jobs every X minutes |
| schedule_ahead_for | Will schedule ahead for X minutes the group’s jobs |
| schedule_lifetime | If the job is not finished after X minutes, it will be mark as failed |
| history_cleanup_every | Will clean the cron_schedule ended tasks every X minutes |
| history_success_lifetime | Will keep the successed jobs inside the cron_schedule during X minutes |
| history_failure_lifetime | Will keep the failed jobs inside the cron_schedule during X minutes |
| use_separate_process | If 1, each job will run on a separate process. Else, only one process will be created for all the jobs |
Check the cron schedule
We put our cron every 5 minutes in order to see easily if the job is created on the cron_schedule table :

If you don’t want to wait the launch of the cron (every minute on the crontab), you can run the command :
./bin/magento magento cron:run
When you modify the crontab.xml file, remove the /var/generation and /var/cache folders
Create a cron group
Change the crontab.xml file like this :
<?xml version="1.0"?>
<config xmlns:xsi="http://www.w3.org/2001/XMLSchema-instance" xsi:noNamespaceSchemaLocation="urn:magento:module:Magento_Cron:etc/crontab.xsd">
    <group id="maxime_jobs">
        <job name="maxime_jobs_disable_jobs" instance="Maxime\Jobs\Cron\DisableJobs" method="execute">
            <!-- Every five minutes -->
            <schedule>*/5 * * * *</schedule>
            <!--<config_path>jobs/cron/schedule</config_path>-->
        </job>
    </group>
</config>
Delete created task inside the table cron_shedule with job_code “maxime_jobs_disable_jobs”
Delete /var/cache and /var/generation folders
Run the cron command :
./bin/magento magento cron:run
The job is not scheduled on the table !
Why ? Because Magento does not know ou new group !
Create the file :
app/code/Maxime/Jobs/etc/cron_groups.xml
With this content :
<config xmlns:xsi="http://www.w3.org/2001/XMLSchema-instance" xsi:noNamespaceSchemaLocation="urn:magento:module:Magento_Cron:etc/cron_groups.xsd">
    <group id="maxime_jobs">
        <schedule_generate_every>15</schedule_generate_every>
        <schedule_ahead_for>20</schedule_ahead_for>
        <schedule_lifetime>15</schedule_lifetime>
        <history_cleanup_every>10</history_cleanup_every>
        <history_success_lifetime>60</history_success_lifetime>
        <history_failure_lifetime>600</history_failure_lifetime>
        <use_separate_process>0</use_separate_process>
    </group>
</config>
You can see the Magento configuration, but here it’s for our custom group.
Delete /var/cache and /var/generation folders
Run the cron command :
./bin/magento magento cron:run
And you will see our job !
Put the cron schedule on Magento configuration
In order to have a configuration field for the schedule, change the crontab.xml file :
<?xml version="1.0"?>
<config xmlns:xsi="http://www.w3.org/2001/XMLSchema-instance" xsi:noNamespaceSchemaLocation="urn:magento:module:Magento_Cron:etc/crontab.xsd">
    <group id="maxime_jobs">
        <job name="maxime_jobs_disable_jobs" instance="Maxime\Jobs\Cron\DisableJobs" method="execute">
            <!-- Configuration expression -->
            <config_path>jobs/cron/schedule</config_path>
            <!--<schedule>*/5 * * * *</schedule>-->
        </job>
    </group>
</config>
Now, we will add the configuratio field, take the file
app/code/Maxime/Jobs/etc/adminhtml/system.xml
And replace it with this code :
<?xml version="1.0"?>
<config xmlns:xsi="http://www.w3.org/2001/XMLSchema-instance" xsi:noNamespaceSchemaLocation="urn:magento:module:Magento_Config:etc/system_file.xsd">
    <system>
        <tab id="jobs" translate="label" sortOrder="1000">
            <label>Jobs</label>
        </tab>
        <section id="jobs" translate="label" type="text" sortOrder="10" showInDefault="1" showInWebsite="1" showInStore="1">
            <label>Jobs</label>
            <tab>jobs</tab>
            <resource>Maxime_Jobs::jobs</resource>
            <group id="department" translate="label" type="text" sortOrder="10" showInDefault="1" showInWebsite="1" showInStore="1">
                <label>Department configuration</label>
                <field id="view_list" translate="label comment" type="select" sortOrder="10" showInDefault="1" showInWebsite="1" showInStore="1">
                    <label>Show job list</label>
                    <comment>Show department's job list of the viewing department</comment>
                    <source_model>Magento\Config\Model\Config\Source\Yesno</source_model>
                </field>
            </group>
            <group id="cron" translate="label" type="text" sortOrder="20" showInDefault="1" showInWebsite="0" showInStore="0">
                <label>Cron configuration</label>
                <field id="schedule" translate="label comment" type="text" sortOrder="10" showInDefault="1" showInWebsite="0" showInStore="0">
                    <label>Schedule</label>
                    <comment><![CDATA[
<pre>
* * * * *
| | | | |
| | | | +---- Day of the Week   (range: 1-7, 1 standing for Monday)
| | | +------ Month of the Year (range: 1-12)
| | +-------- Day of the Month  (range: 1-31)
| +---------- Hour              (range: 0-23)
+------------ Minute            (range: 0-59)
Example: 0 0 * * * Daily at midnight
</pre>
                            ]]></comment>
                </field>
            </group>
       </section>
    </system>
</config>
Then, modify the file :
app/code/Maxime/Jobs/etc/config.xml
With this content :
<?xml version="1.0"?>
<config xmlns:xsi="http://www.w3.org/2001/XMLSchema-instance" xsi:noNamespaceSchemaLocation="urn:magento:module:Magento_Store:etc/config.xsd">
    <default>
        <jobs>
            <department>
                <view_list>1</view_list>
            </department>
            <cron>
                <!-- Every day at midnight -->
                <schedule>0 0 * * *</schedule>
            </cron>
        </jobs>
    </default>
</config>
By default, we schedule the cron every day at midnight :

Now, you can edit this value and test the configuration you want.
It’s over for the cron ! Next time, we will create our first helper !

The creation of the cron group was not mentioned anywhere else. Thank you so much! You made my day!
Your welcome ! I’m very happy that you enjoy this training program 😉
It is awesome article. Thank you very much!
Nice article. A few tips for anyone else new to cron in general; cron also allows you to use values 0-6 (Sunday-Saturday) for the day column. You could also use the more human-friendly version and just write mon, tue, wed, etc…
0 -> Sun
1 -> Mon
2 -> Tue
3 -> Wed
4 -> Thu
5 -> Fri
6 -> Sat
7 -> Sun
The following example would run “command” at midnight every monday, tuesday, and friday:
0 0 * * mon,tue,fri command
I have this one confusion after read your method of creating cron job in Magento. I read another tutorial here: https://magenticians.com/setup-cron-job-magento-2/
They created run.php file to configure the cron job. You instead created disablejobs.php for this. Are the two interchangeable?
Thanks for your article. I’m testing your cron code in Magento 2.1.8.. it work fine if I set the tag “schedule” in /etc/crontab.xml, but it don’t work if i set the schedule by config_path. If i try to do it, the cron don’t run and if I verify the list of crons (with n98-magerun2) i see the cron but in the schedule section i see a list of dashes.
me too exactly the same,
Not shure why because it compiles fine, and if Ichange the path for the schedule works fine.
I double check that the path it is correct,
Good tutorial for beginners thanks for sharing 🙂